Forces In Deep Drawing Sheet Metal
Force used to accomplish a sheet metal deep drawing operation must be adequate
enough to provide for the sheet's deformation, enact proper metal flow and overcome friction
during the process. Magnitude of force must not be too high or
applied incorrectly, or else tearing of the sheet metal may occur. The
punch and the blankholder will exert separate forces and force analysis
should be done for both.
Understanding the material flow during the manufacturing process is essential to
understanding the forces acting on the work. Imagine placing a piece of
paper flat on a round cup. This is similar to a piece of sheet metal on
a round die cavity. Now, imitating the action of the punch, the paper is
forced into the cup to take the cylindrical form of the cup. What happens
is the paper folds or wrinkles in the process. This is not how a sheet metal
work piece should act during a deep drawing operation. One reason is that
metal material can flow, unlike the paper. So instead of the paper, place
a piece of aluminum foil on the cup. Aluminum foil is metal but it still
wrinkles when forced into the cup. The reason why aluminum foil wrinkles
when forced into the cup is because of the inadequate thickness of the
foil.
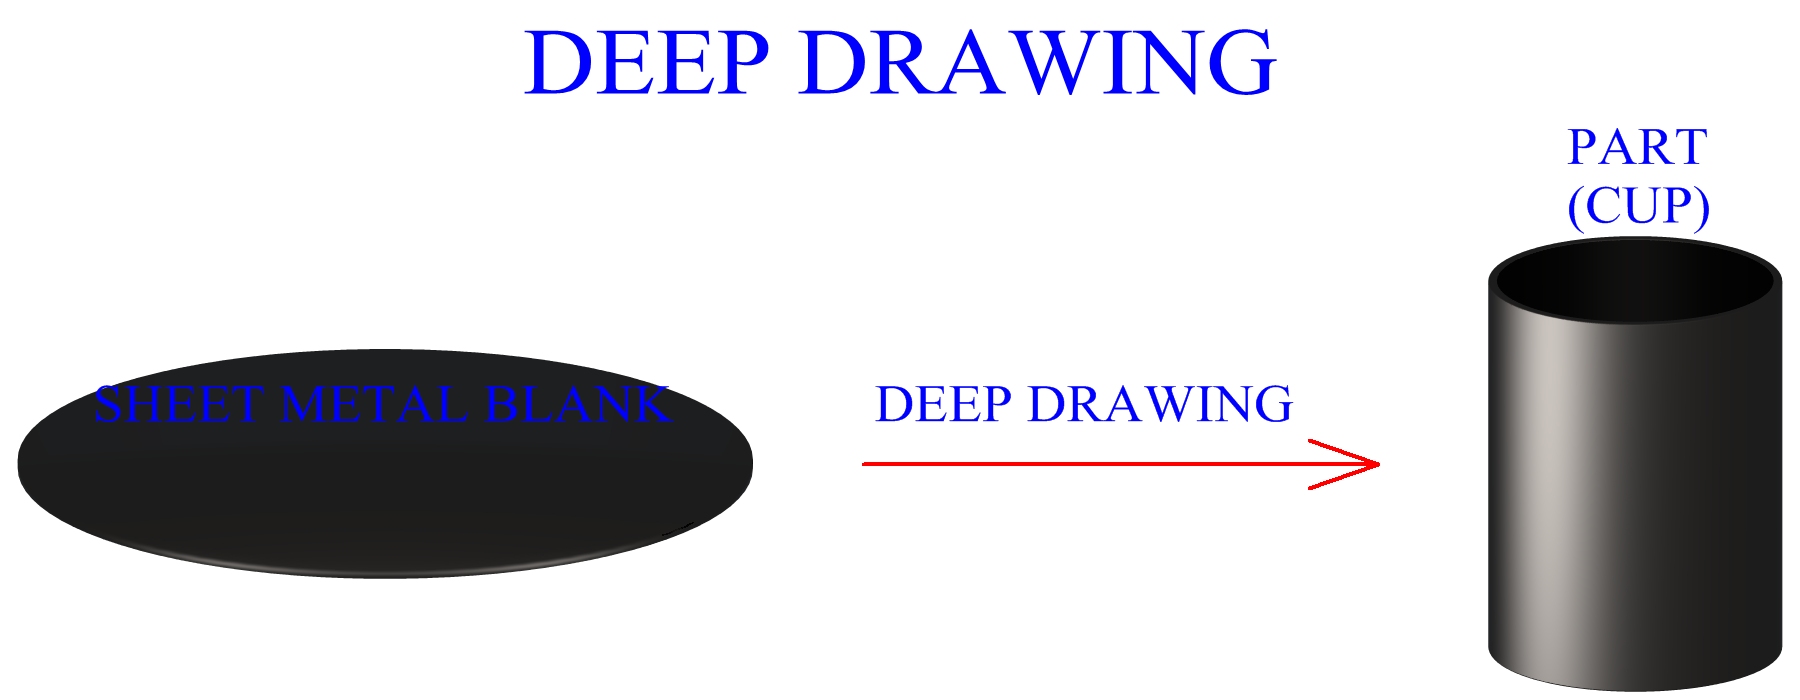
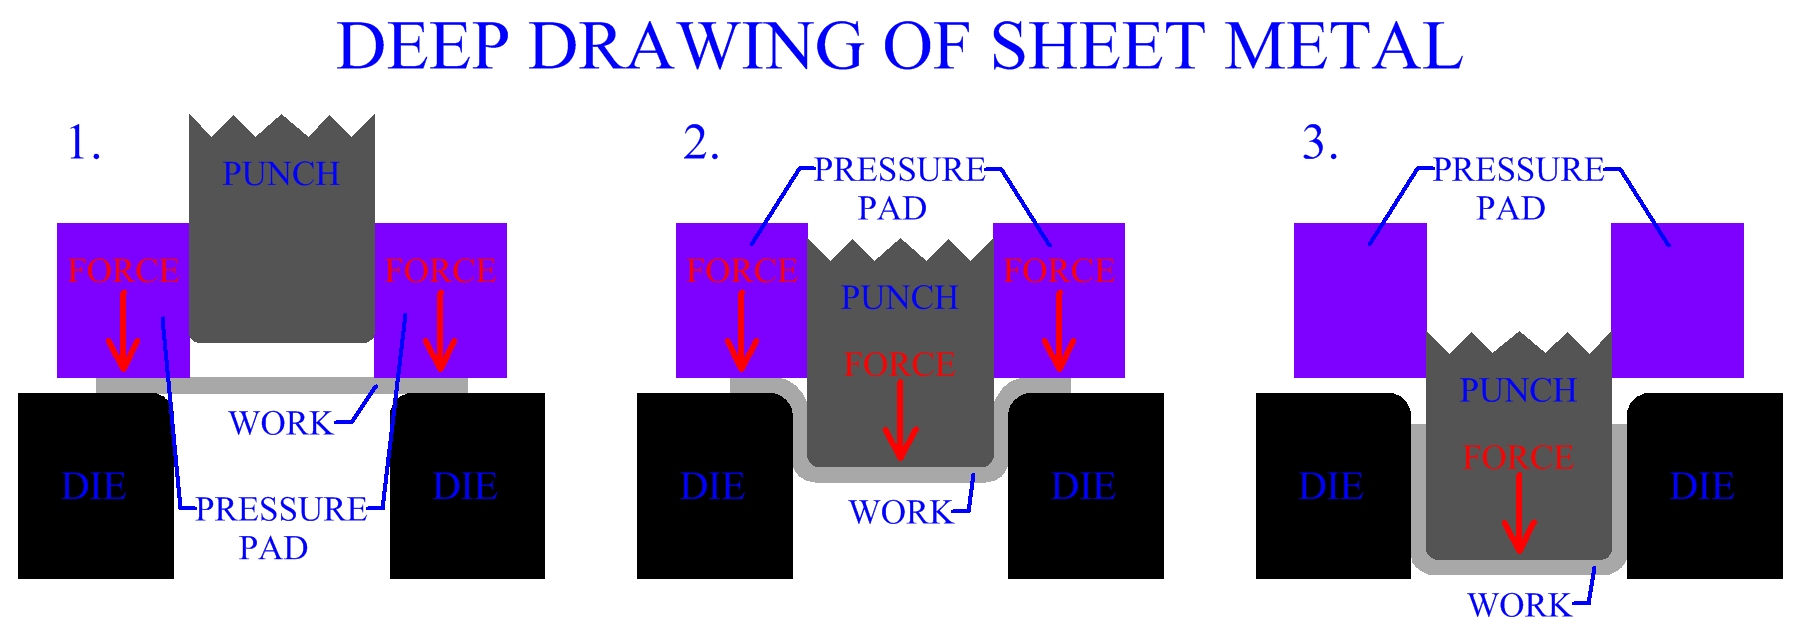
Imagine now, a sheet metal blank being deep drawn into a round
cylindrical part. The material under the punch gets forced into the cavity,
pulling material with it, to form the walls of the part. Sometimes in deep drawing
an amount of sheet metal material is not drawn into the die and forms a flange around
the completed part. However, during a deep drawing operation all of the
material not yet drawn over the die radius and into the die cavity is often
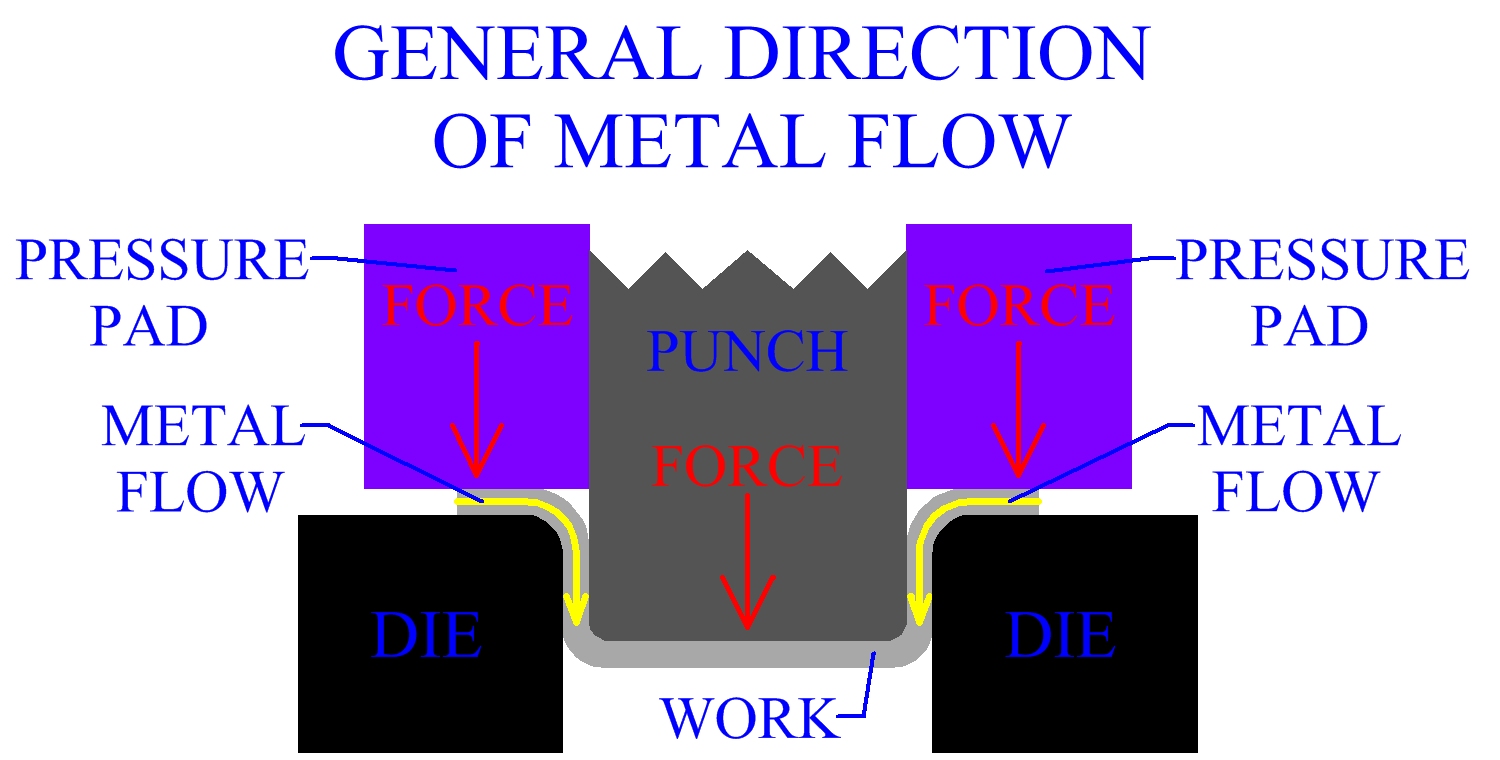
referred to as the flange. During the ongoing process material from the
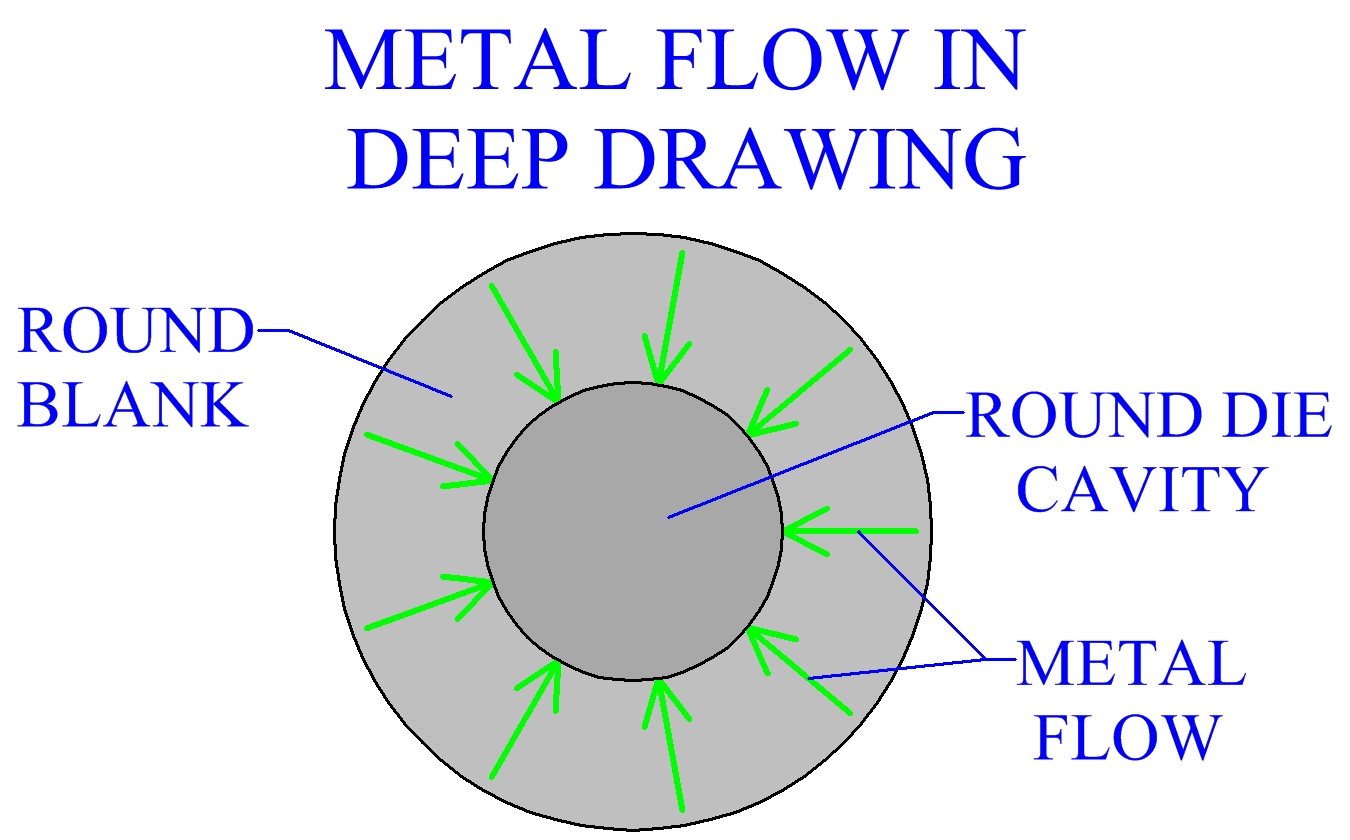
flange is constantly being forced into the die. The diameter of the die
cavity is smaller than that of the sheet metal blank and metal is flowing
from the outer peripheral inwards.
Figure:297

|
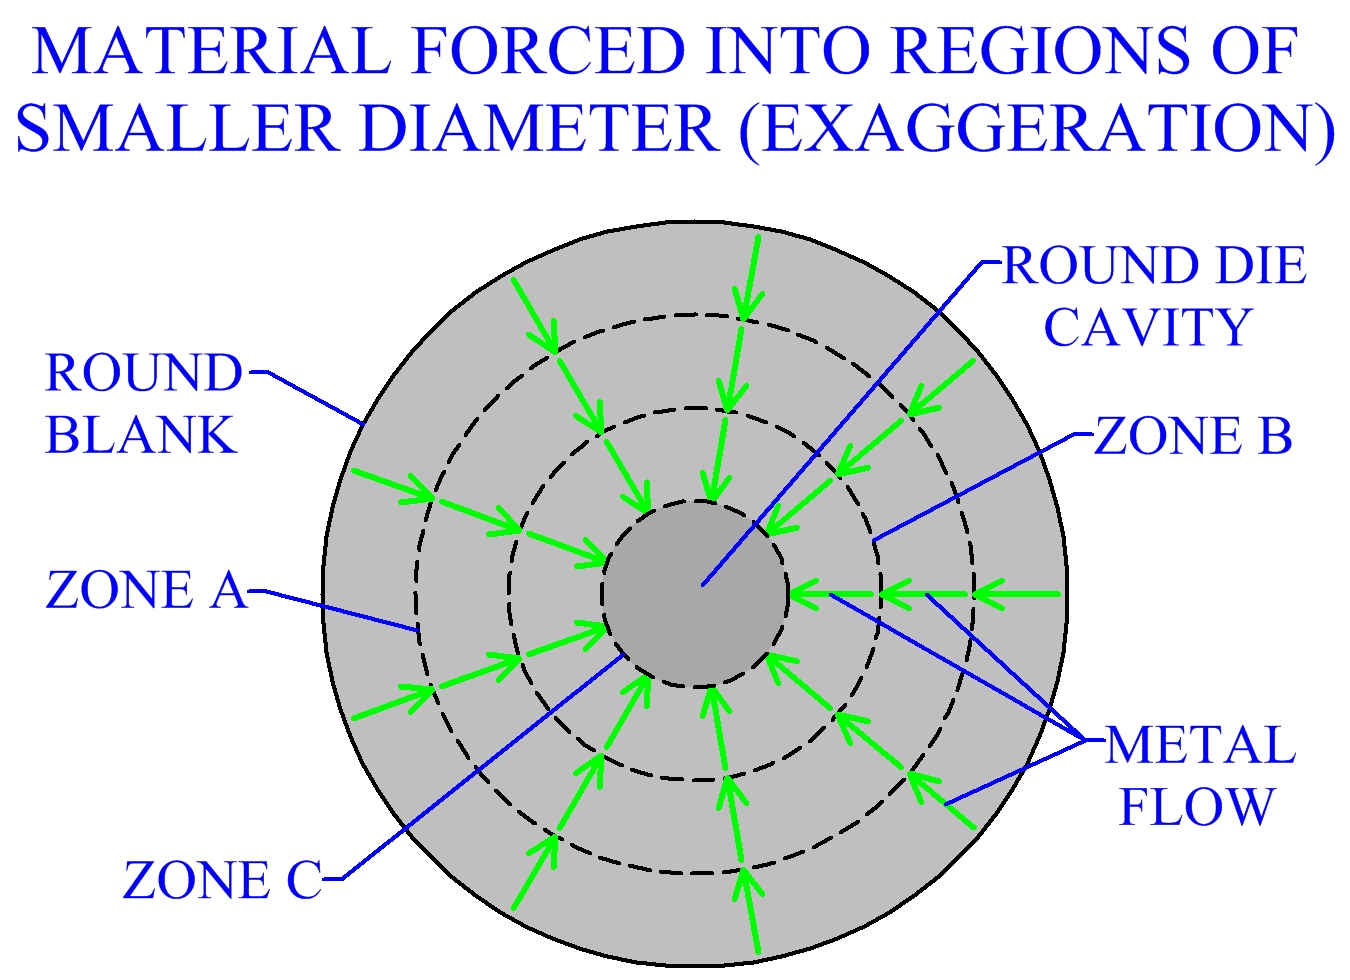
It can be illustrated that more material is being forced into smaller
spaces, since the same material from the peripheral is moving into a
circle of smaller diameter.
Figure:298

|
Metal flow can be observed in the figure above. As the deep
drawing progresses metal from zone A is forced into zone B, metal from
zone B is forced into zone C and metal from zone C is forced into the
die cavity. This continues until eventually, (providing no flange in the
final product), even the material in zone A is forced into the cavity.
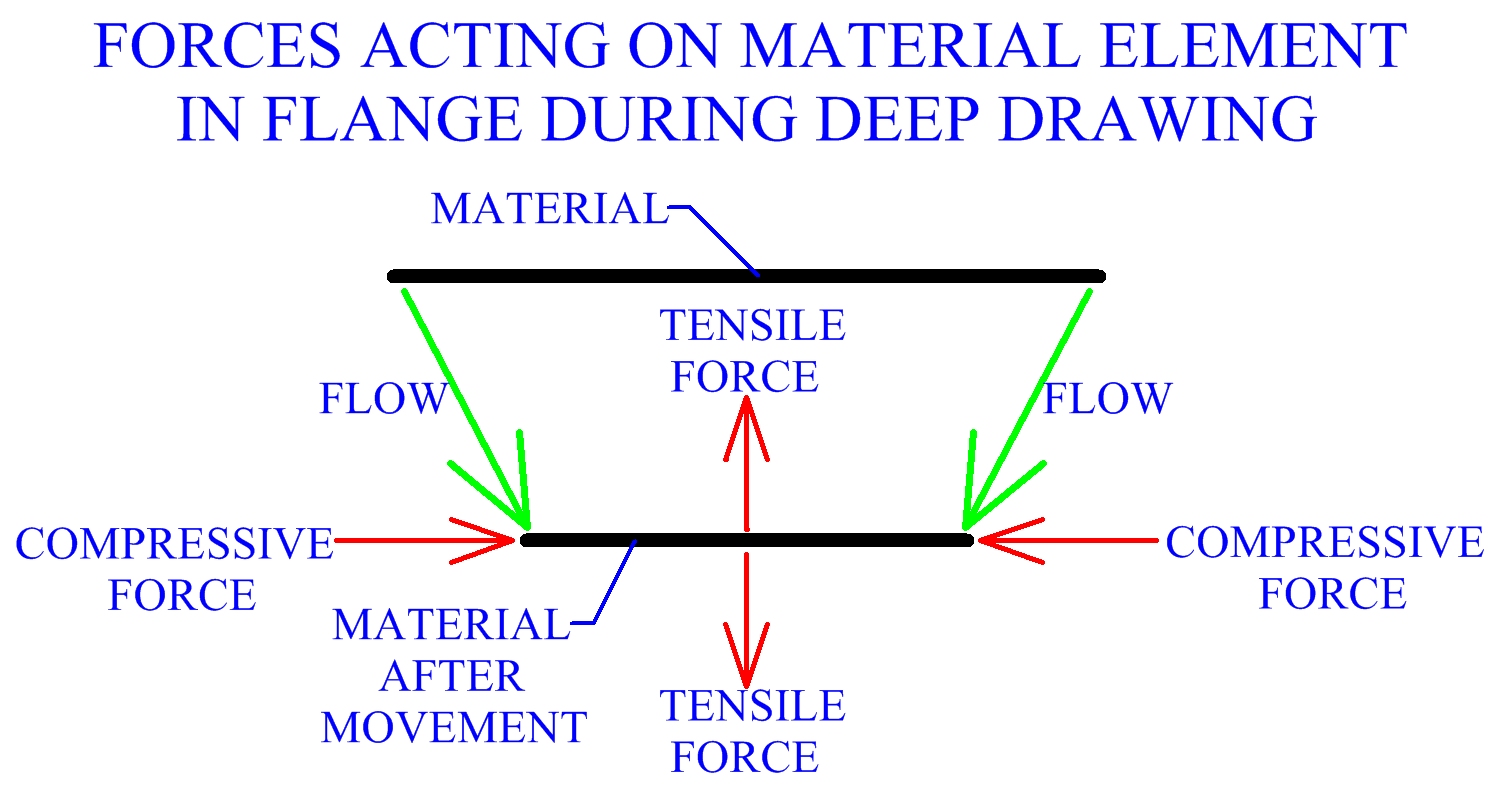
The constriction of space will cause compressive forces to act within
the material. Tensile forces will also be present in the flange because
of the drawing of the metal into the die.
Figure:299

|
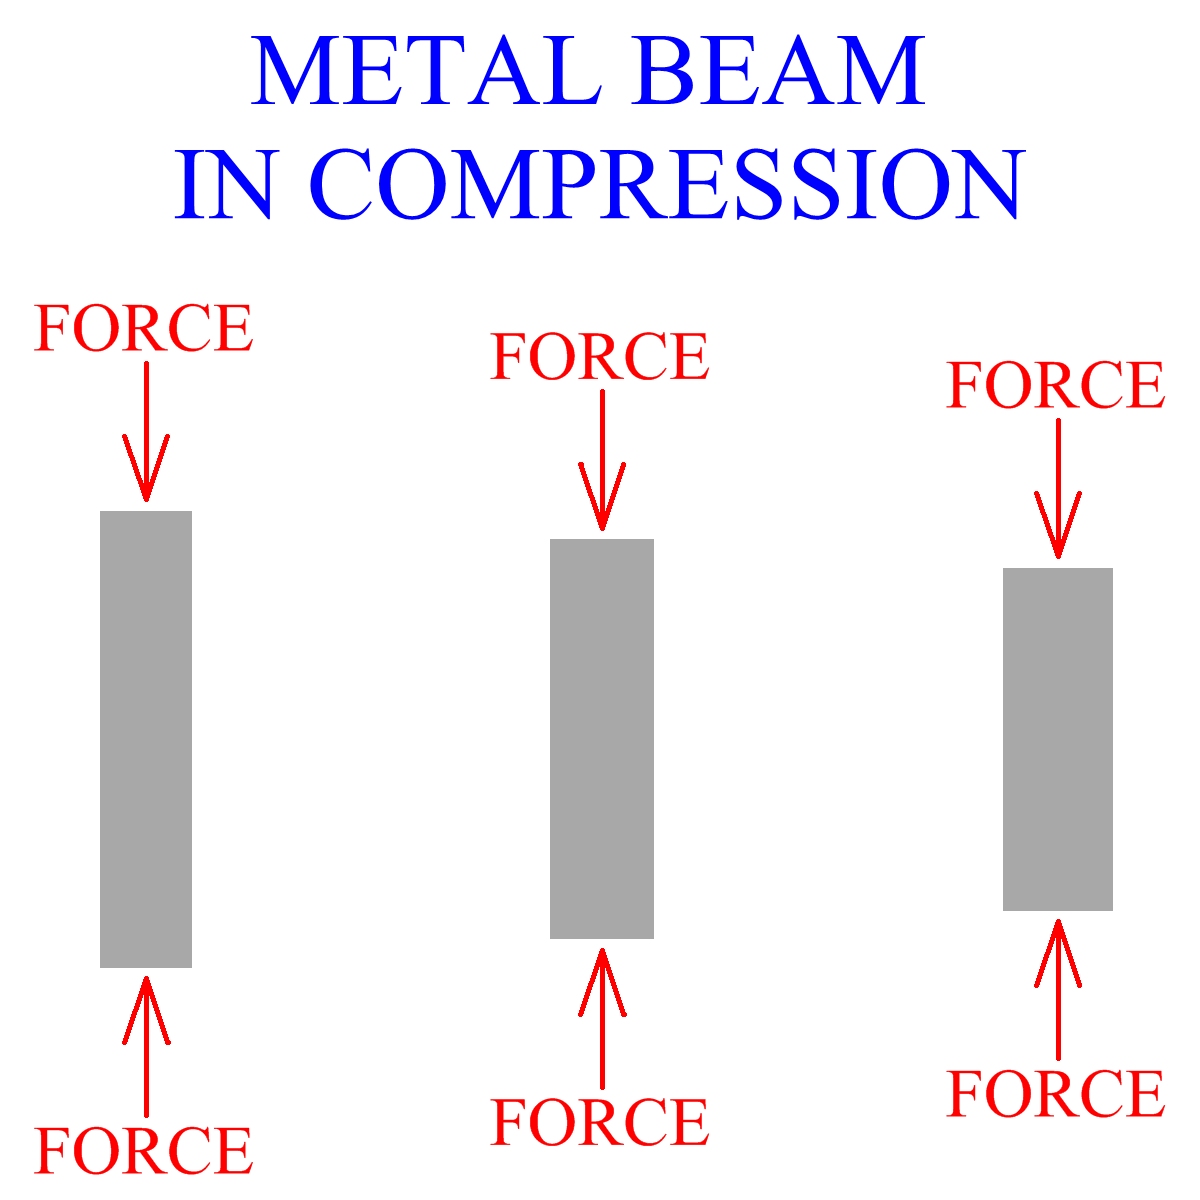
Compressive forces on material elements in the flange can be
related to the analogy of a metal beam in compression, such as the
one illustrated in the following figure.
Figure:300

|
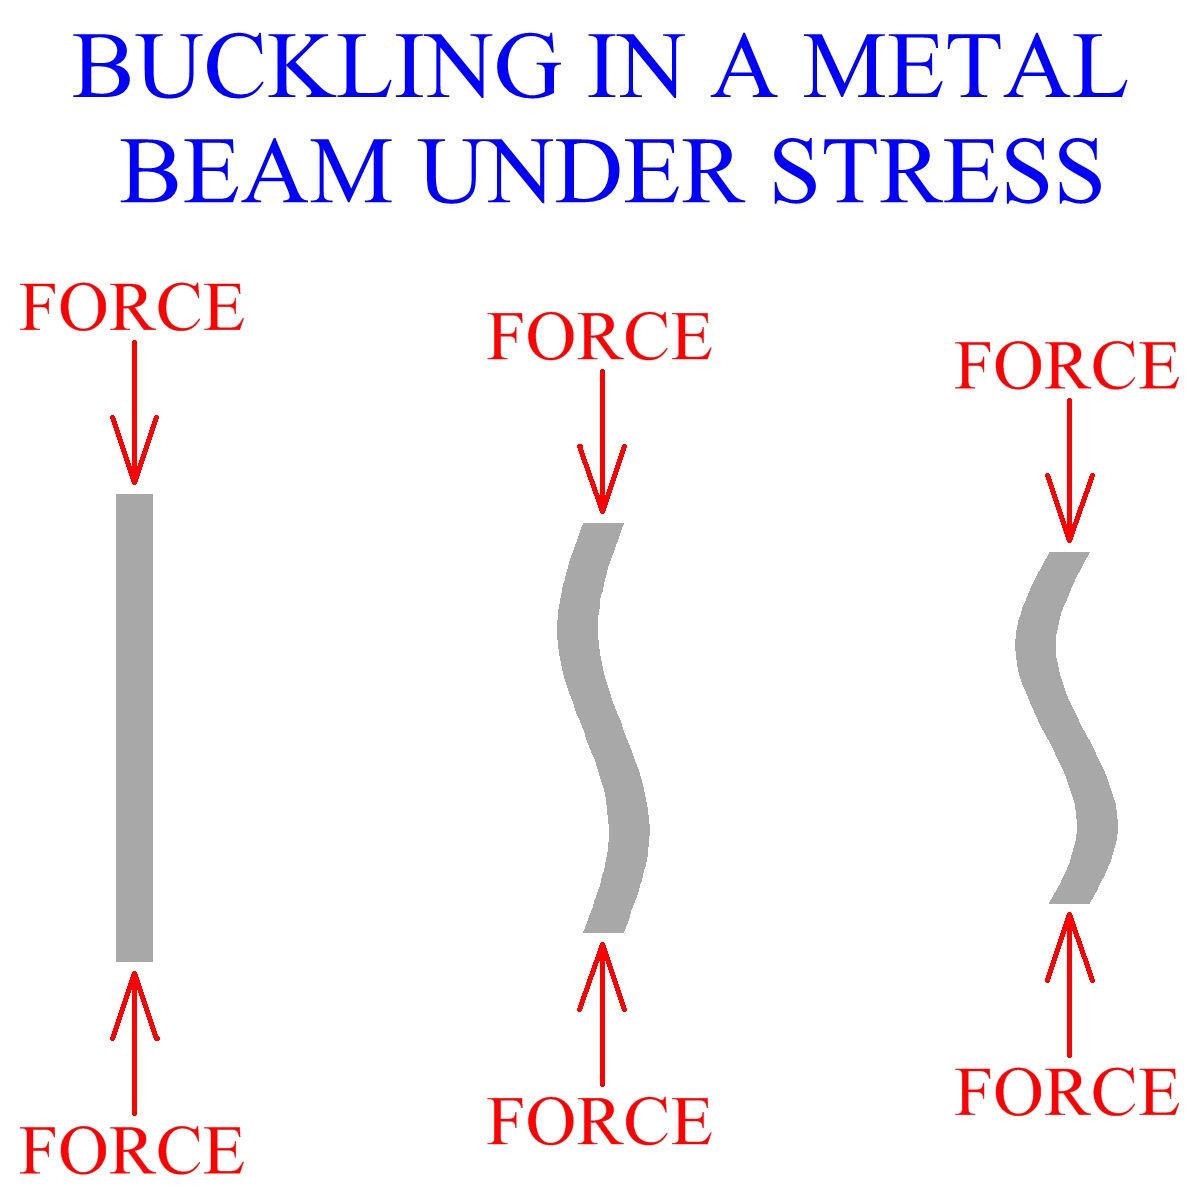
Now imagine decreasing the width of the beam. If the width
becomes low enough, relative to length, the beam will tend to buckle
under stress.
Figure:301

|
This is similar to the situation in the flange during a sheet metal deep drawing
operation. As mentioned, the force exerted on the beam is similar to the
compressive forces acting on the blank's material. Reducing the width of
the beam is equivalent to reducing the thickness of the sheet metal. The
buckling of the beam is manifested in the wrinkling of the sheet metal. The
thicker beam has a high enough width to allow for proper metal flow.
A metal beam of greater width is equivalent to a thicker sheet metal blank.
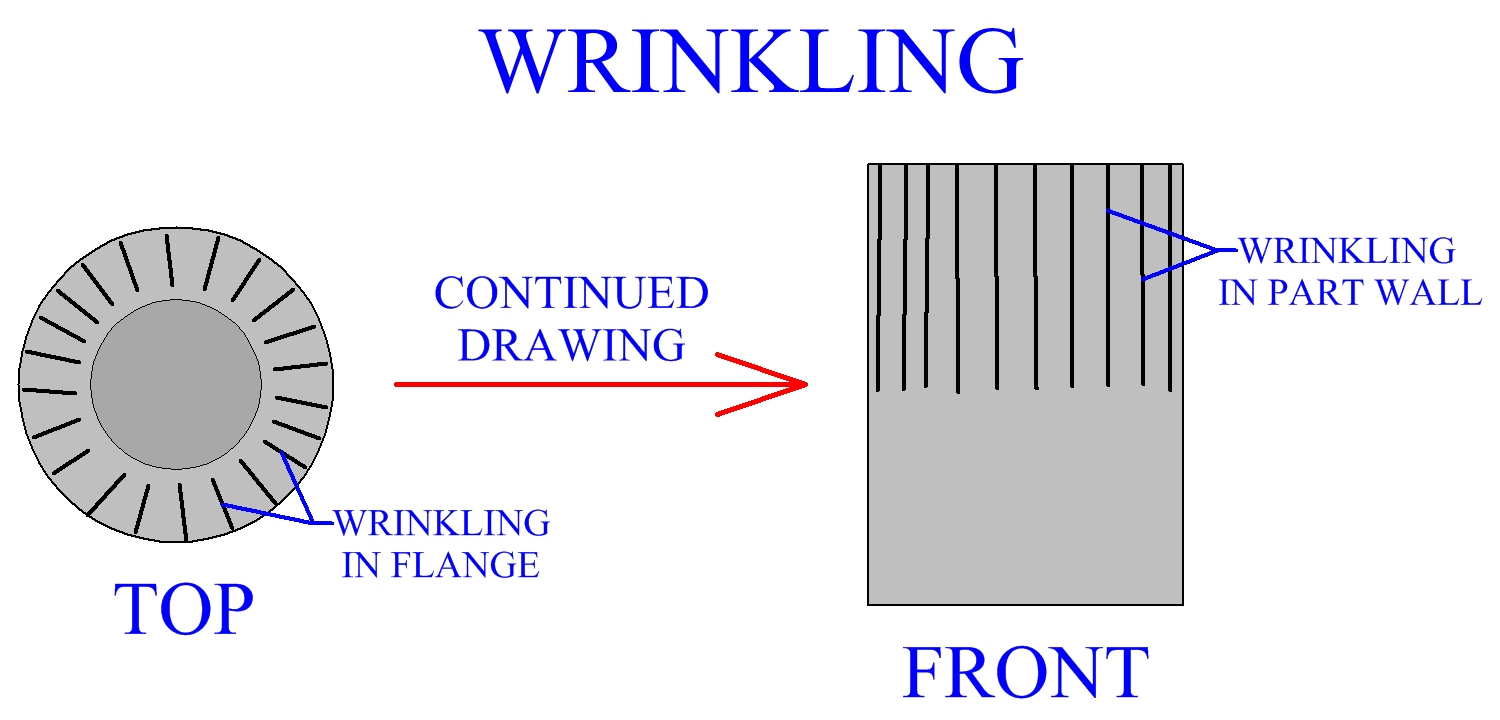
It is now evident that the lower the sheet metal thickness the more likely
it is to wrinkle during deep drawing. Wrinkles start in the flange. Once
wrinkling starts, it will continue to propagate. Wrinkles that start in the
flange are pulled into the die and will end up in the part's walls.
Figure:302

|
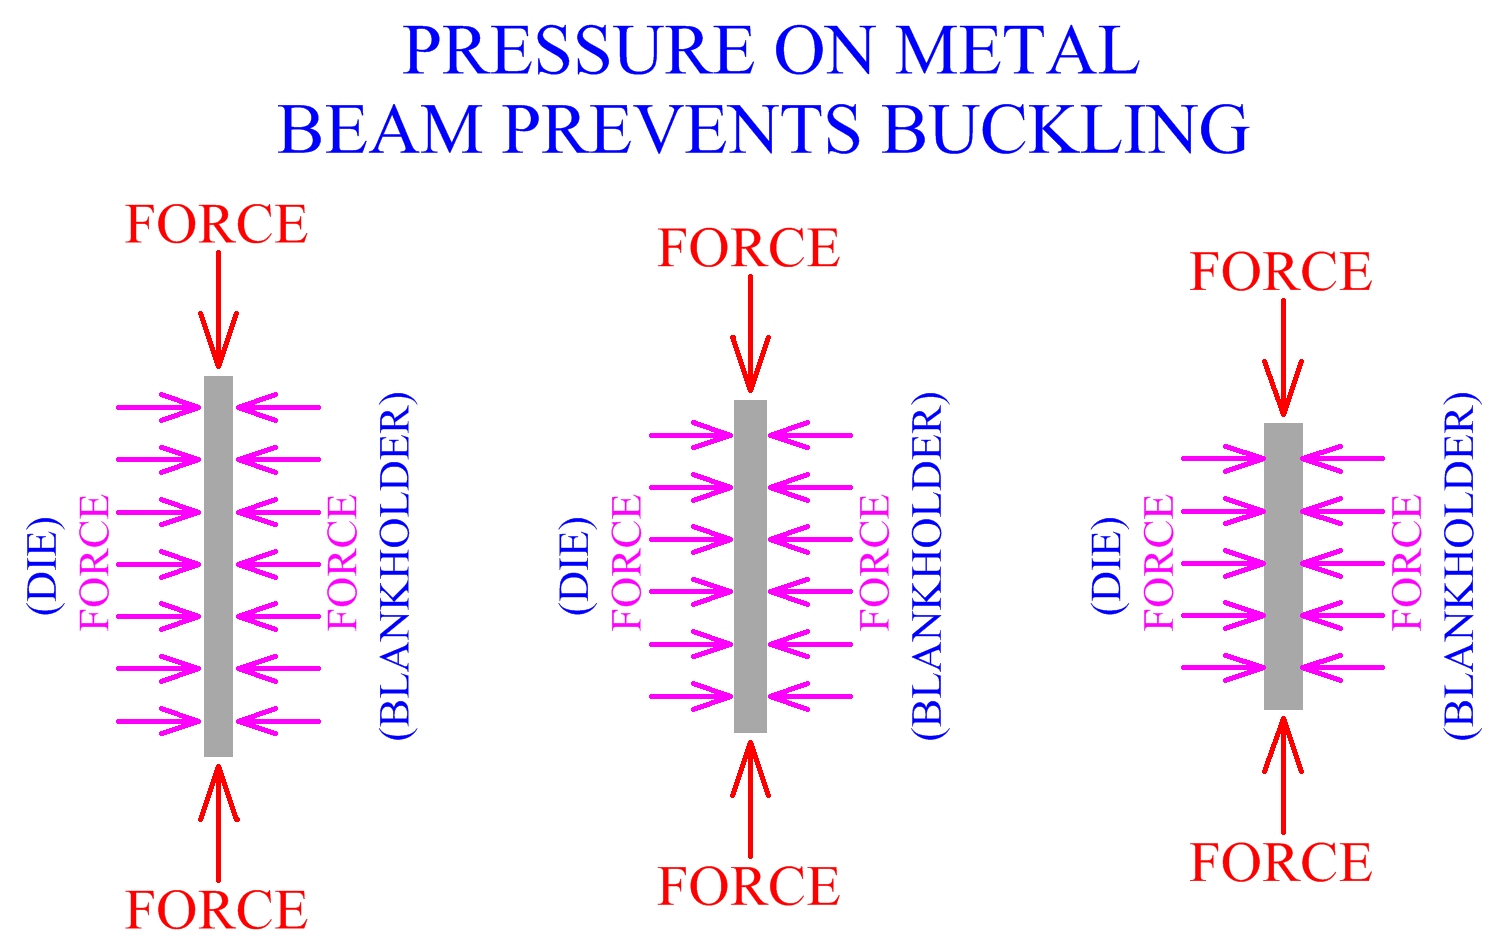
In order to solve the problem of sheet metal wrinkling a blank holder is used.
By applying pressure to the surface of the blank, the blank holder can
prevent wrinkling for many parts. The blankholder would be the
equivalent to force applied over the side of the thinner beam, causing
it to compress properly, rather than buckle. However, remember this is
only an analogy to help understand the mechanics occurring. The actual
situation is different, since forces and material flow are also occurring simultaneously
in other directions.
Figure:303

|
Sheet metal thickness is an important aspect of deep drawing process
design. Thickness to diameter ratio is a main factor used to quantify the
geometry of a blank and can be calculated by t/Db.
Thickness is represented by t, and Db is the diameter of
the blank. For noncircular sheet metal parts the maximum diameter is sometimes
used. Usually it is expressed as a percent t/Db X 100%.
Blankholders are generally effective for thickness ratios of 1% and over.
Ratios of .5% to 1% are marginal and for thickness ratios under
.5% even a blankholder may not prevent wrinkling.
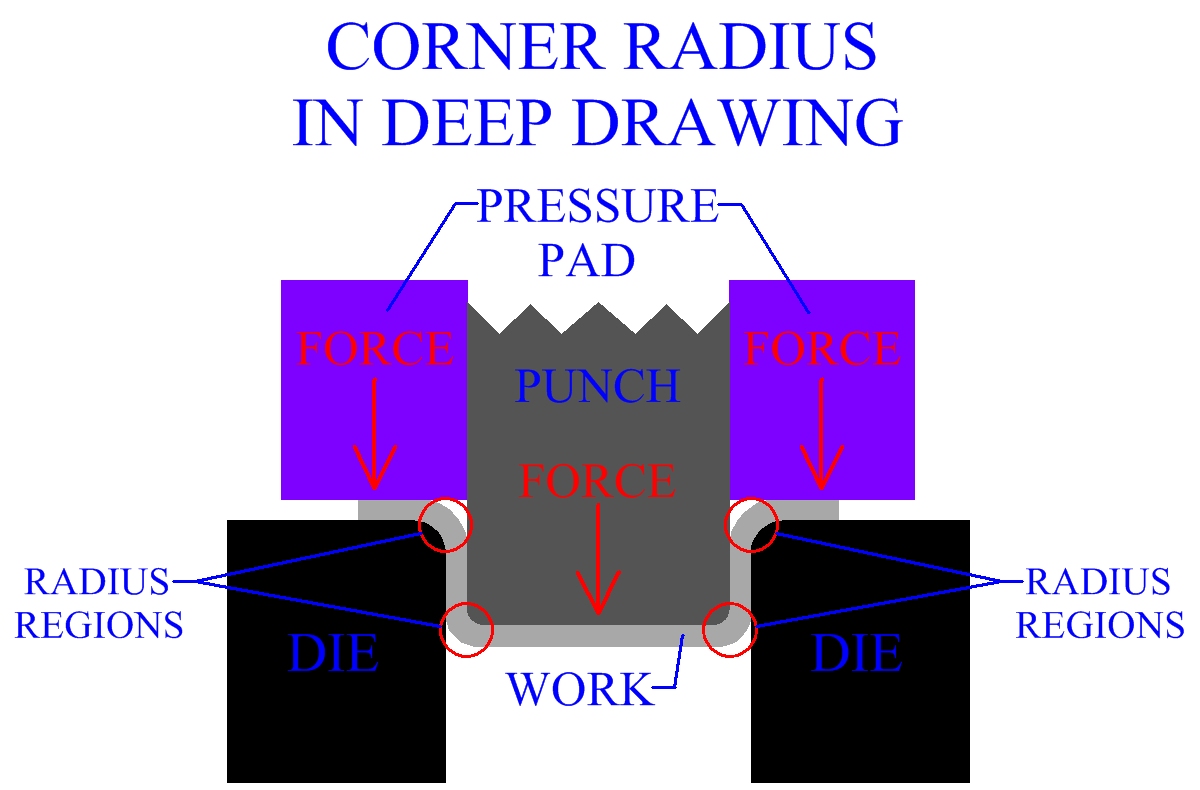
Die corner radius and punch corner radius are important in force
distribution and material flow during the sheet metal deep drawing process.
Figure:304

|
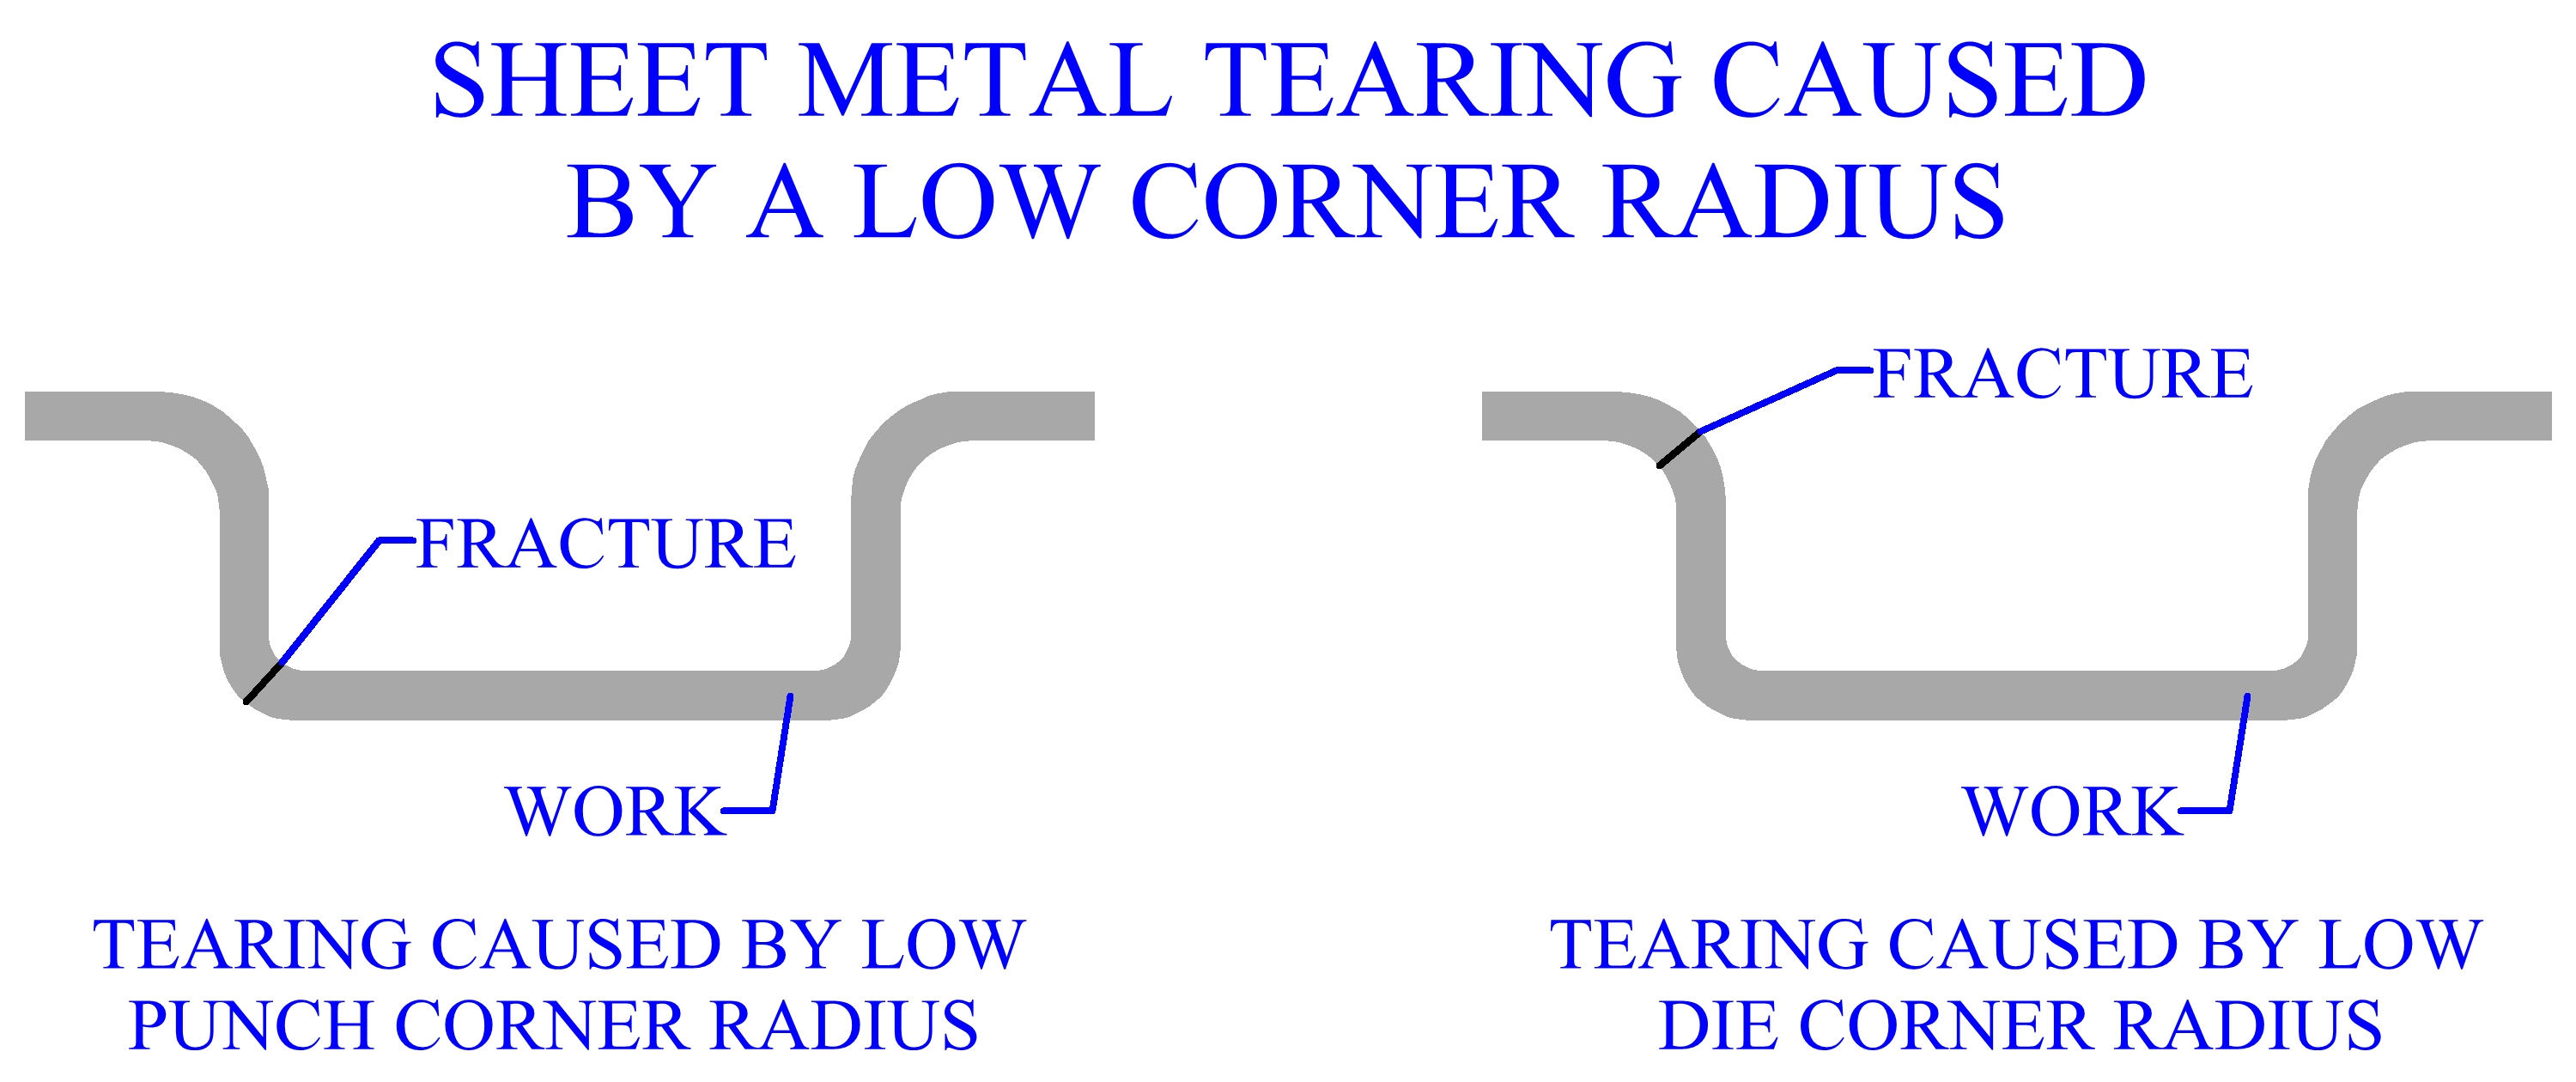
Corner radius, for deep drawing manufacturing, should be sufficient
to allow for smooth metal flow.
If a radius is too small, the sheet metal can tear. Often this occurs as the
material is traveling over the corner. Optimization of corner radius should be
achieved, because if the radius is too large it may cause wrinkling. While low
corner radius can be a source of stress, that can initiate tearing at
another location in the part. However, sometimes the location of the
occurrence of the tear, in the sheet metal, will be an indication of the cause.
Figure:305

|
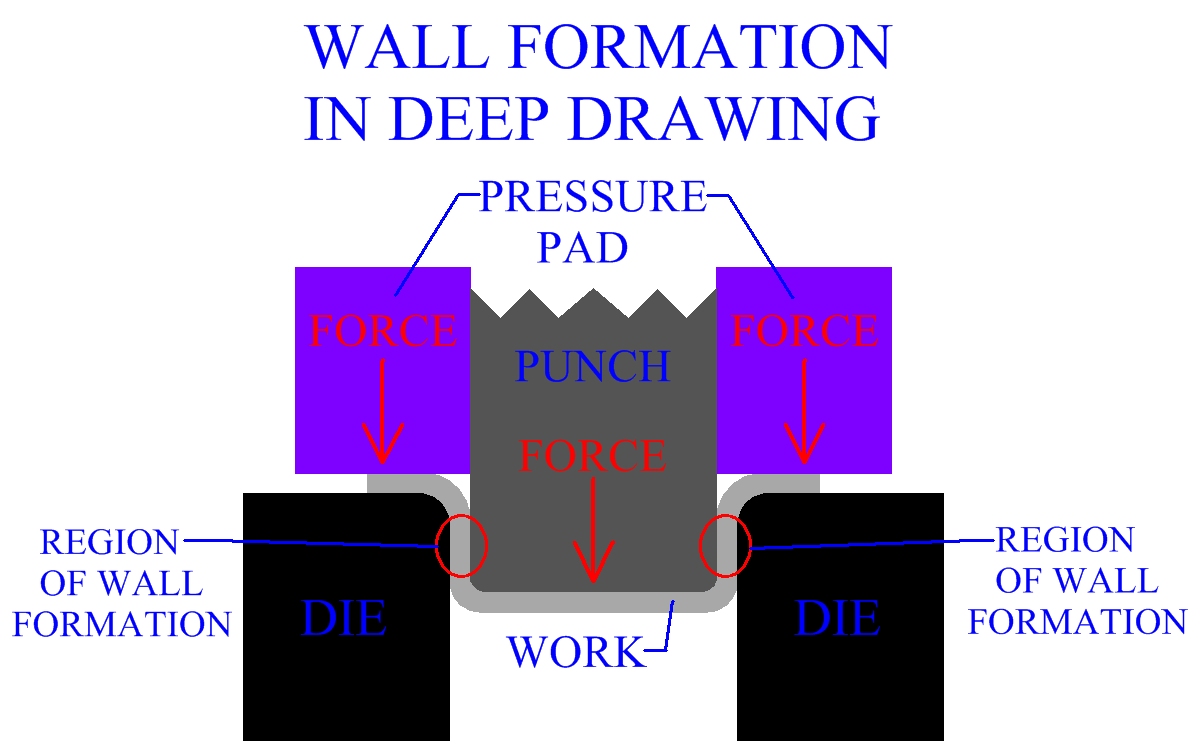
Forces involved in the formation of the part wall are also important.
Figure:306

|
As the punch progresses, it draws material from the flange into the
die cavity, increasing the length of the part wall. Metal forming the part's walls
is in tension. Even though material is constantly being drawn from the flange
region to supply the growing part walls, the tension forces will tend to create
a thinning effect. Thinning will usually be greatest near the part's base.
The decrease in thickness, occurring in the walls of a deep drawn part, is
mitigated by control of process parameters. A certain level of thinning is
usually unavoidable. Often, the manufacturing process of ironing is
employed to finish deep drawn parts by evening the wall thickness.
Punch force and blankholder force should be determined when designing
a particular sheet metal deep drawing operation. Punch force will vary throughout the
operation. Commonly, the punch force will reach its maximum at about
1/3 of the stroke. Both punch force and blankholder force are dependent on
punch and die geometry, punch and die radius, blank geometry, blank
thickness, blank material and friction. Although it will differ, a common value
for the blankholder force is about 30% to 40% of the maximum punch force.
References are available to calculate these forces, based on these variables.
Blank Optimization For Deep Drawing
Sheet metal blank material, thickness and shape are major elements in deciding the
nature of the metal flow and forces. All the factors involved in a deep drawing
manufacturing process will have an effect on the quality of the part. Sheet metal parts can
be tested for formability. Blanks are often printed with a square grid with circles
in each grid box. The squares and circles distort with the sheet metal as the
process occurs. After drawing, the blanks can be studied to determine blank
distortion, thinning and the general direction of metal flow as a result of the
deep drawing process. By examining different proportions of bi-axial straining
and areas of tearing, an understanding of the blank's behavior can be created.
Forming limit diagrams are often constructed to quantify the results of these
experiments.
One major goal is to optimize the shape of the sheet metal blank for a certain deep
drawing process. Excess material in the work can interfere with metal flow
and increase forces acting within the blank while drawing. In order to optimize
the shape of the sheet metal blank, the flow of material during an operation must first be known.
A common deep drawing is a square box. When a square box is drawn from
a square blank it is obvious that the metal does not flow evenly into the die
from all directions.
Metal flows faster and easier into the die cavity from the sides of the
blank than from the corners. More complex metal flow at the corners causes
more impedance to material movement. Less metal is drawn from these sections as
a result. Removal of material, from areas such as this, will improve metal flow
and reduce forces. The optimal blank shape will vary for different
parts and contours. Computer programs have
been developed to predict such shapes, given the parameters. However, it
should be remembered that actual trail and error testing is a vital part of deep
drawing process design and sheet metal manufacturing.
Defects In Deep Drawing Manufacturing
Defects that occur during deep drawing of sheet metal can be controlled
by careful regulation of process factors. Tearing is one of the most common
defects. Excessive thinning in areas of the sheet metal is also an unwanted
defect. Causes of these are mostly too high or improper force distribution
and material considerations. Many times the reduction ratio needs to be
evaluated. Ratios for initial reduction are usually 35% to 45%, but can be
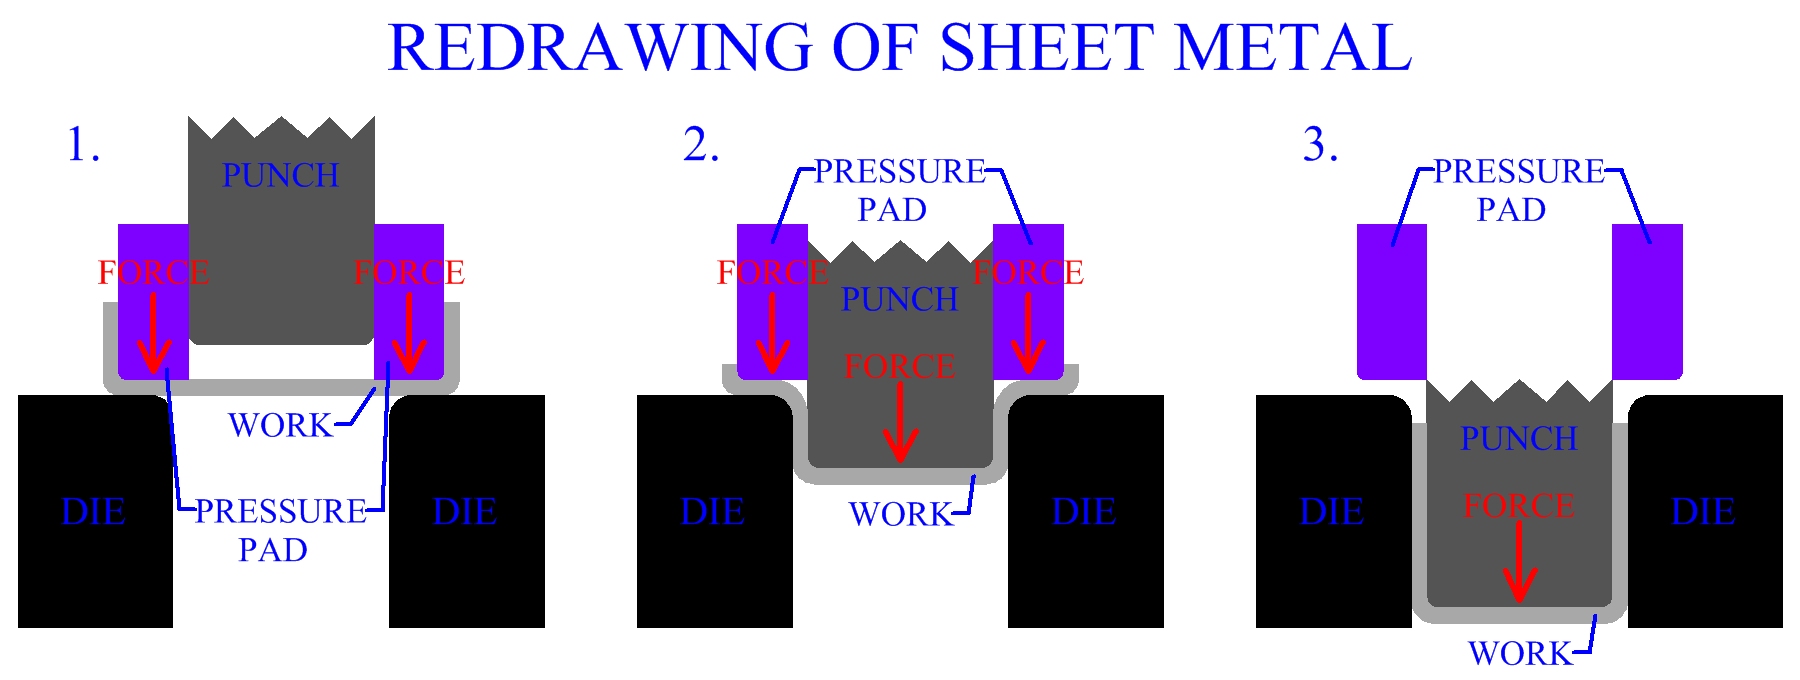
lower. Redraws are always less. Reduction ratios may need to be lower, or
annealing of the metal may be necessary to allow for sufficient redrawing.
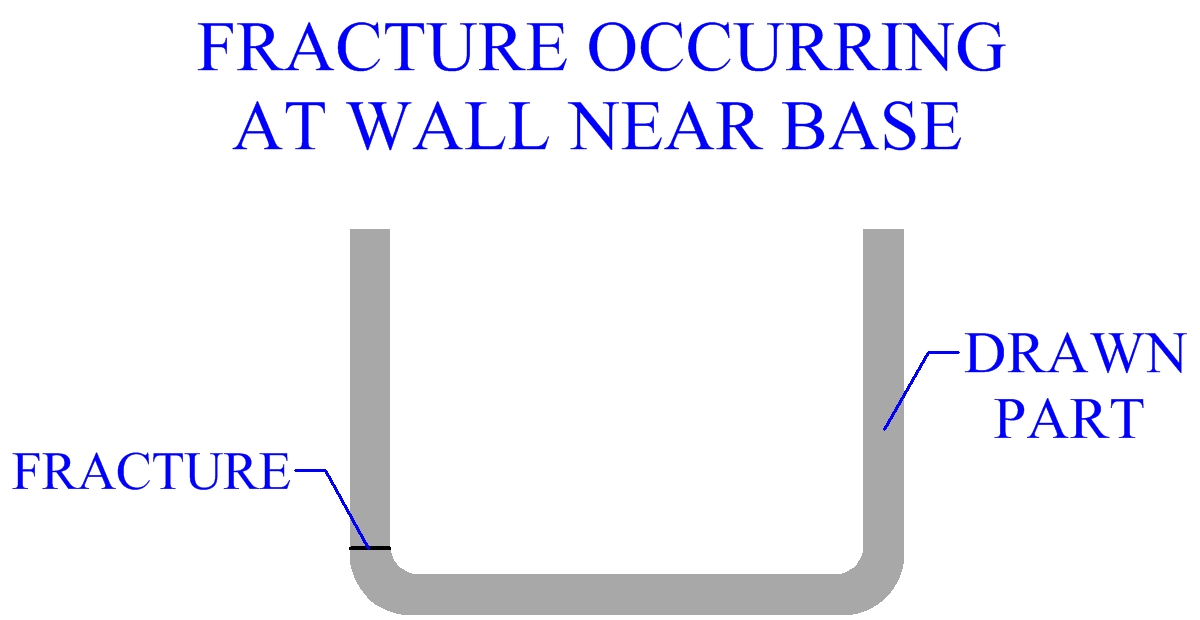
Usually maximum thinning of the cup wall occurs near the base. For this
reason, tearing of the sheet metal is most likely to occur in this region even if
the stress is originating somewhere else.
Another reason for the tearing of the sheet metal may be excessive force
caused by material impediments, due to an inefficient blank shape. When
tearing occurs at the corners of the wall it may indicate a problem with the
blank's geometry. Surface of the blank is important also, gouges, scratches and
pits can all cause propagation of cracks. Blankholder force must be sufficient.
However, friction between blankholder, blank and die surfaces will act to
resist the movement of the blank's material into the die. Thus, excess friction
will increase the force the punch exerts to draw the sheet metal. Higher punch forces
usually cause a tear in the weakest spot, predominately in the cup wall near
the base. For this reason, the blankholder force must not be too high.
Figure:307

|
Die and blankholder surfaces for deep drawing sheet metal must be as smooth
as possible, they should be ground and lapped to mitigate friction.
Any type of friction will increase force,
hence stresses in the material. Friction between the punch and work surfaces,
as well as friction over corners, can be a source of failure. Lubrication is
important in deep drawing of sheet metal. Lubrication will allow for easier
metal flow and more uniformly distributed metal strains, due to decreasing
friction. Lubrication also helps to reduce wear on tooling and machinery.
Lubricants are applied to both sides of the sheet metal blank. Common lubricants used in
deep drawing include oil, soap, emulsions, wax and sometimes solid lubricants.
Wrinkling is another common defect and was discussed in detail earlier.
Wrinkling may often occur if the blankholder force is too low. Therefore
optimization of blankholder force is necessary, since too high a force will cause
excess friction. Sheet metal thickness is an essential parameter. As stated
earlier, with a thickness ratio of .5% or under even a blankholder may not
stop wrinkling. If corner radius is not high enough tearing may occur, but if
the corner radius is excessive this may also cause wrinkling. Corner radius,
like holding force, must obtain an optimum value.
Earing is a problem characteristic to deep drawing. Earing is the formation
of wavy edges at the open end of the drawn cup. These are usually trimmed.
The anisotropy of a particular sheet metal blank is the predominant
source of earing.
Surface scratches or irregularities may appear on drawn parts. Make
sure punch and die surfaces are smooth. Other causes of surface
scratching could be improper clearance, or inadequate lubrication.
Drawbeads
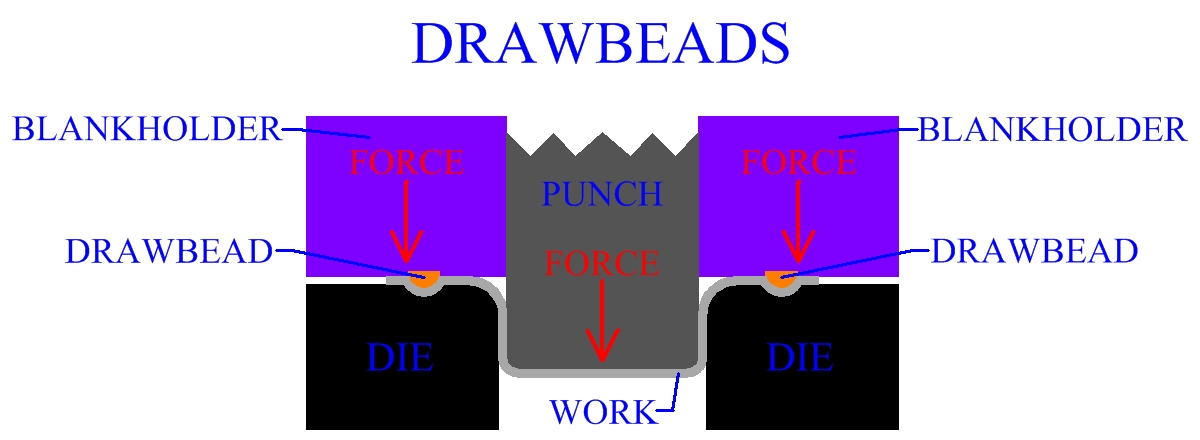
Drawbeads are sometimes used to help regulate metal movement
during deep drawing manufacture. Drawbeads bend and unbend metal as it travels into
the die cavity, thus altering its flow. Drawbeads can reduce the necessary
blankholder force.
Figure:308

|
Drawing Without A Blankholder
In some situations sheet metal deep drawing can be performed without a
blankholder. This makes the manufacturing process simpler and tooling cost lower,
in cases that it can be applied to. The process requires sheet metal with a high thickness
ratio, to avoid wrinkling. For deep drawing without a blankholder thickness ratio should
be at least 3%. A sheet metal blank is placed on a die and pushed through by a punch,
similar to the standard deep drawing process. The die, when drawing without a
blankholder, will have a special curve to facilitate the forming of the part in this
manner.
Irregular Deep Drawings
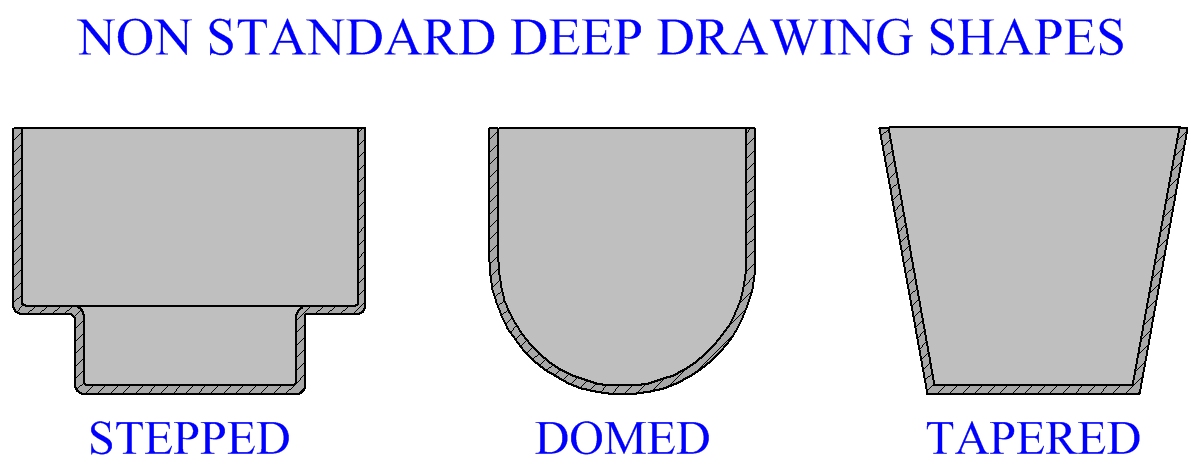
Common non standard deep drawing part geometries include stepped,
tapered and domed cups. Stepped parts can be created by partial redrawing.
Domed cups are formed with a stretch forming type process. Tapered cups
can be manufactured by first producing stepped cups, then the sides are formed
to create the tapered shape.
Figure:309

|
Embossing
Embossing is a sheet metal forming operation related to deep drawing.
Embossing is typically used to indent the metal with a design or writing.
This manufacturing process has been compared to coining. Unlike coining, embossing uses
matching male and female die and the impression will affect both sides of
the sheet metal.
Designing A Deep Drawing Operation
Designing a deep drawing manufacturing process will require planning, calculations and
probably some in house testing. Calculate the surface area of the finished part
and allow for a trimming allowance. Set the surface area of the part equal to the
surface area of the sheet metal blank, then solve for Db. Extra material can be
added to the blank, (ie. +10% Db), this will create a flange that
can be trimmed off latter. This can help calculate a standard optimum blank shape
for the operation.
Measure the thickness ratio = t/Db X 100%. Thickness ratio
should be over 1% or wrinkling may be a problem. Calculate percent reduction.
r = (Db - Dp)/(Db) X 100%. If the percent
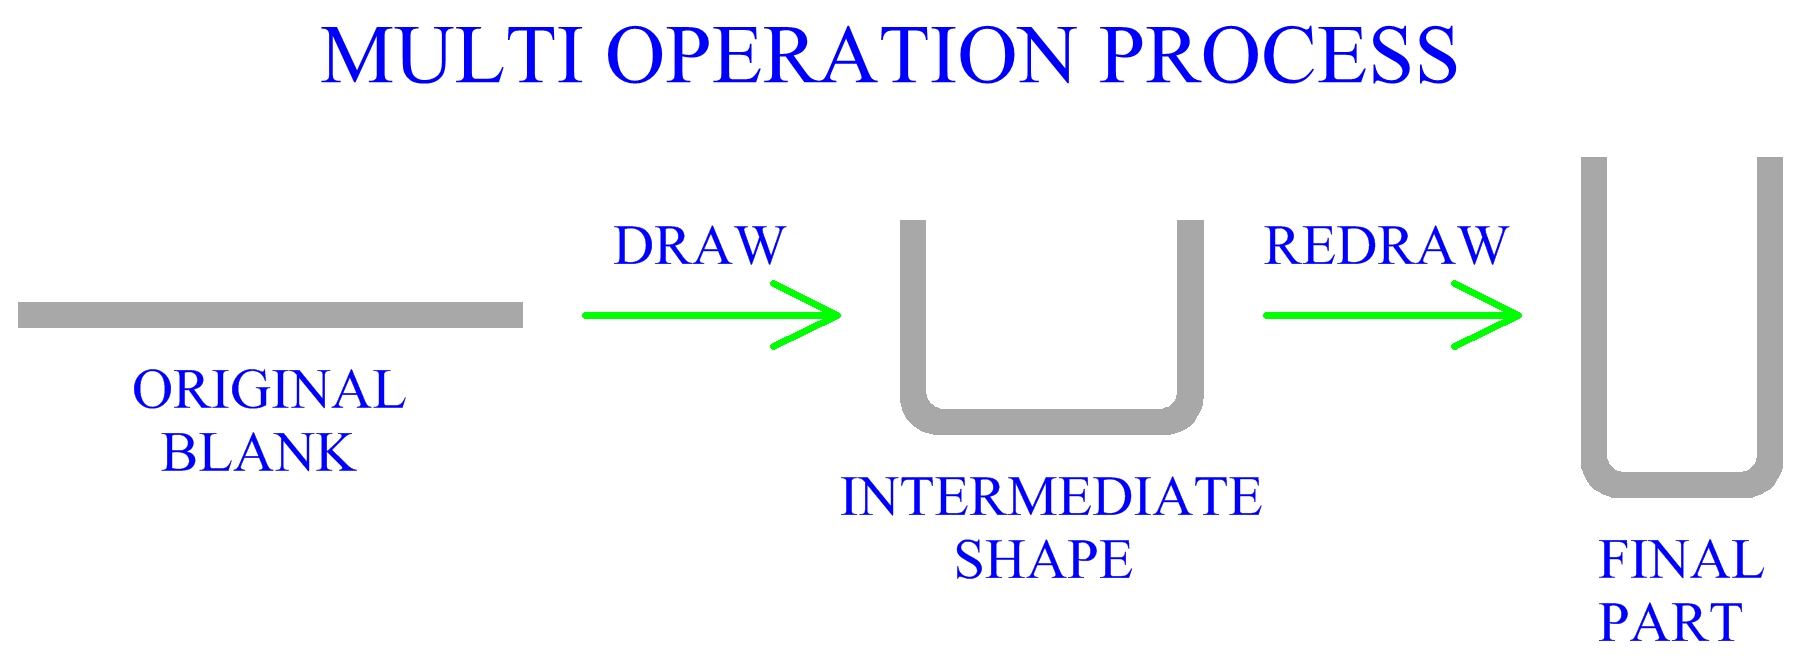
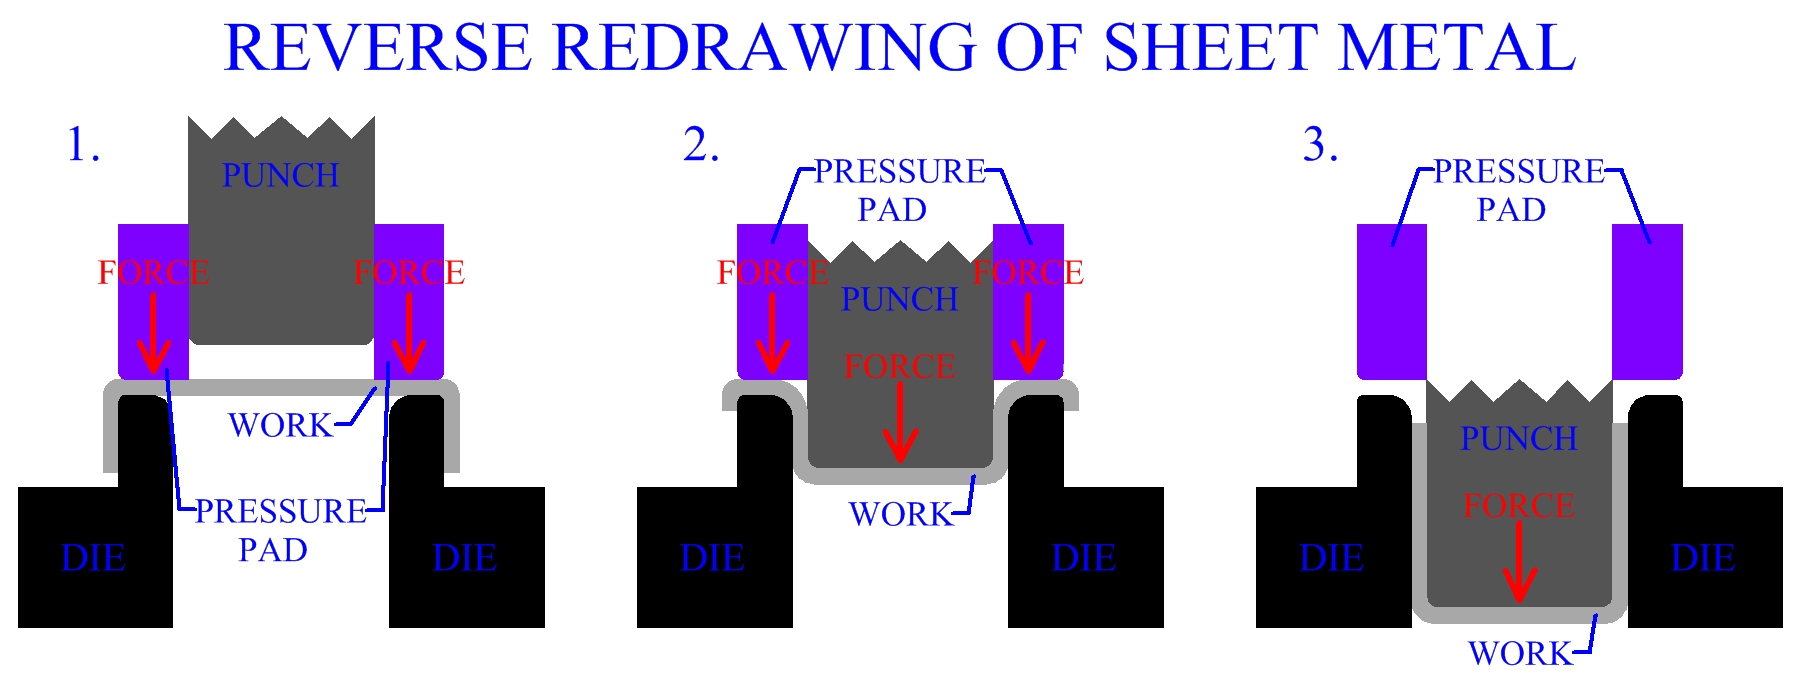
reduction is over 50% plan for redrawing operations. Redrawing will require the
design of intermediate shapes. When designing intermediate shapes, consider the
reduction, then set the surface areas of the blank, intermediate parts and
final drawing to be equal.
Required punch and blankholder force can be calculated based on blank
shape, blank thickness, punch and die shape, punch and die corner radius,
sheet metal material and friction. Deep drawing process iteration through trial and error
can optimize the manufacturing operation over time. Process factors such as amount of
reduction, blank shape, corner radius, or blankholder force may have to
be adjusted based on the results of previous processes.
TOP
|
